A trailer can have sound tyres, working brakes and a secure coupling, yet still be unsafe to tow if its lights are not communicating properly with the vehicle. Knowing how to wire trailer socket connections correctly helps you diagnose simple faults, fit a replacement plug or socket, and understand when the job needs professional attention. The key is not guessing wire colours or terminal positions – it is identifying the socket type, following the correct pin layout and testing every function before heading onto the road.
Start by identifying the trailer socket type
Most UK towing setups use either a 7-pin socket or a 13-pin socket. Older trailers and many basic utility trailers commonly use a 7-pin connection, while 13-pin sockets are now the usual choice for caravans and newer towing installations. A 13-pin system provides the standard road-light circuits as well as additional connections for reversing lights and, where fitted, caravan power supplies.
Do not assume that a plug will be wired in the same way simply because it physically fits. Older 7-pin systems may use the familiar black plastic plug, while a 13-pin plug twists and locks into place. The terminal markings inside the plug or socket are the authority. Wire colours are helpful, but terminal numbers and functions matter more, particularly on an older trailer that may have been repaired more than once.
Before taking anything apart, photograph the existing wiring and note which lights currently work. If you are replacing a damaged socket on the vehicle, check whether the issue is really at the socket. Corrosion in a lamp holder, a poor trailer earth or a damaged cable can cause exactly the same symptoms.
What you will need before wiring a trailer socket
For a straightforward repair, use a good-quality replacement socket or plug that matches your existing system, automotive cable of the correct size, wire strippers, side cutters, a small screwdriver and a multimeter or trailer-light tester. Heat-shrink sleeving and proper crimp terminals are worthwhile where cables need extending or repairing.
Work with the vehicle ignition off and disconnect the trailer before opening the socket. If you are fitting new electrics to a vehicle rather than repairing a trailer lead, disconnecting the vehicle battery may be appropriate, but check the vehicle handbook first. Some modern vehicles have battery-monitoring systems, coded audio units or procedures that should be followed.
Avoid household cable connectors, insulating tape as a permanent repair, and twisted wires pushed under a terminal screw. Trailer wiring lives low to the ground, where it faces water, road salt, vibration and stone damage. A tidy, sealed connection lasts far longer and is much less likely to leave you without brake lights on a wet evening.
How to wire trailer socket terminals correctly
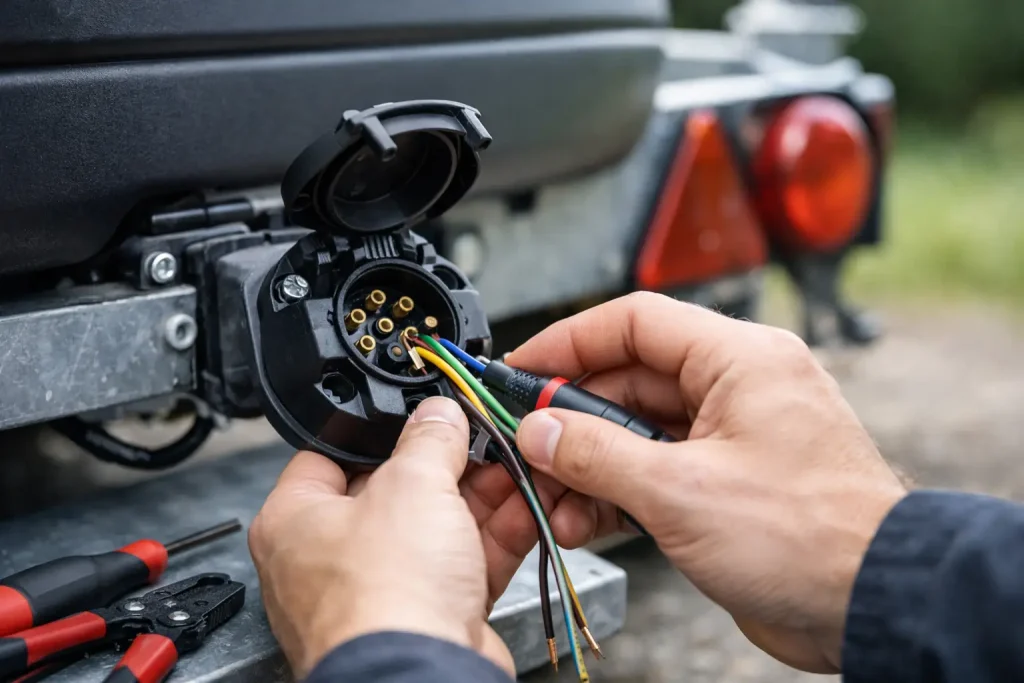
Open the plug or socket housing and look for the numbered terminals or markings. On a standard 7-pin road-light system, the functions are generally as follows:
- Pin 1: left-hand indicator – yellow
- Pin 2: rear fog lamp – blue
- Pin 3: earth return – white
- Pin 4: right-hand indicator – green
- Pin 5: right-hand tail light and number-plate light – brown
- Pin 6: brake lights – red
- Pin 7: left-hand tail light and number-plate light – black
This layout is often called the 12N arrangement. The split tail-light circuits on pins 5 and 7 allow separate left and right vehicle lighting circuits, while both can feed number-plate lamps on the trailer. On some older trailers, colours may have faded, been substituted, or not follow the usual convention at all. Trace each wire back to the relevant lamp if there is any doubt.
A 13-pin plug also has clearly numbered terminals, but it includes extra functions. Pins 1 to 8 cover the core lighting circuits, including reversing light, while the remaining pins can provide permanent and ignition-switched supplies for caravan equipment. These additional feeds are not simply spare wires. They may require relays, fuses and vehicle-specific wiring, so they should be installed to the correct specification rather than connected to the nearest live feed.
Strip only enough insulation to fit the conductor into the terminal. No bare copper should be visible once the screw is tightened. Route the cable through the plug’s cable clamp before terminating the wires, then tighten the clamp on the outer sheath, not the individual cores. This strain relief stops the terminals being pulled loose when the trailer cable is handled.
The earth connection is often the real fault
The white earth wire is one of the most important connections in a trailer socket. A poor earth can create baffling behaviour: indicators that make the side lights flash, dim brake lamps, lights that only work when another circuit is switched on, or a complete failure on one side of the trailer.
Ensure the earth terminal is clean and firmly clamped. On the trailer, the earth wire should also have a reliable connection to each lamp or to a sound metal chassis point, depending on the wiring design. Painted, rusty or corroded metal is not a dependable earth path. Where practical, a dedicated earth wire running to each light is often more reliable than relying solely on the chassis.
If the trailer lights behave strangely only when connected to one vehicle, inspect both the vehicle socket earth and the trailer plug. If the problem follows the trailer when connected to another tow vehicle, focus on the trailer wiring and lamps instead.
Fit and protect the cable properly
Correct terminals alone are not enough. The cable must be routed so it cannot chafe against the drawbar, sharp edges, suspension components or moving brake linkage. Use suitable clips or protective conduit and leave enough slack at the coupling for normal turns, without allowing the cable to drag on the road.
At the vehicle end, make sure the socket lid closes fully and the rubber seal is in good condition. Water inside a socket quickly causes green corrosion on terminals. A small amount of suitable electrical contact protection can help, but it will not cure loose terminals or damaged seals.
If you are fitting a socket to a newer car, SUV or van, avoid tapping into rear-light wires without first understanding the vehicle’s electrical system. Many vehicles monitor bulb loads and use sensitive control modules. A universal bypass relay may suit some vehicles, but vehicle-specific electrics are often the better option because they protect the original wiring and can support trailer recognition functions. Depending on the vehicle, coding may also be required to activate towing features such as rear parking sensor suppression, stability support or altered lighting behaviour.
Test every circuit before towing
Once the socket is reassembled, connect the trailer and test the lights methodically. Check left and right indicators, hazard warning lights, side lights, brake lights, rear fog lamp and reversing light where applicable. Check the number-plate lamps too. It is best to have someone operate the vehicle controls while you watch the trailer, although a trailer-board tester or multimeter can make diagnosis easier when working alone.
Do not settle for lights that merely appear to work. Indicators should flash at the correct speed, brake lamps should be bright, and switching on one circuit should not affect another. With the engine running, check again if the vehicle has a smart charging system or voltage-sensitive electrics.
If a fuse blows, stop and investigate rather than fitting a larger fuse. A blown fuse points to a short circuit, damaged cable, water ingress or an incorrect connection. Increasing the fuse rating risks damage to the vehicle wiring or control module.
When professional trailer electrics are the sensible choice
Replacing a plug on a basic trailer can be a manageable job for someone confident with electrical work. Installing a socket on a modern vehicle is different. It may involve removing trim, routing a dedicated harness, fitting a control module, making protected power connections and coding the vehicle afterwards.
Professional fitting is also sensible when the fault is intermittent, the trailer has brakes or caravan power circuits, or there are signs of melted wiring, repeated fuse failures or corrosion inside multiple connectors. These are the jobs where a quick repair can become a recurring problem if the underlying cause is missed.
At Doncaster Towbars, we fit vehicle-specific trailer electrics and diagnose towing wiring faults for cars, SUVs and commercial vans. If you are unsure whether your trailer needs a 7-pin repair, a 13-pin conversion or a complete new wiring installation, getting the setup checked before your next trip is time well spent.
A correctly wired socket is a small component with a large responsibility. Give the wiring the same attention as your towbar, tyres and coupling, and every journey starts with the lights and signals other road users need to see.